Sunday, August 31, 2014

Peacock Shaker

A Shaker Card is a just what it sounds like.  There is a section of the card that is elevated and backed with a window sheet with little elements enclosed. When you shake the card, the elements jiggle around.

The Friday Mashup (follow the link) has a great challenge this week.


Create a Project using "Animals".
Create a "Shaker card" project.

or Mash it up! and create a "Shaker Card with an Animal".
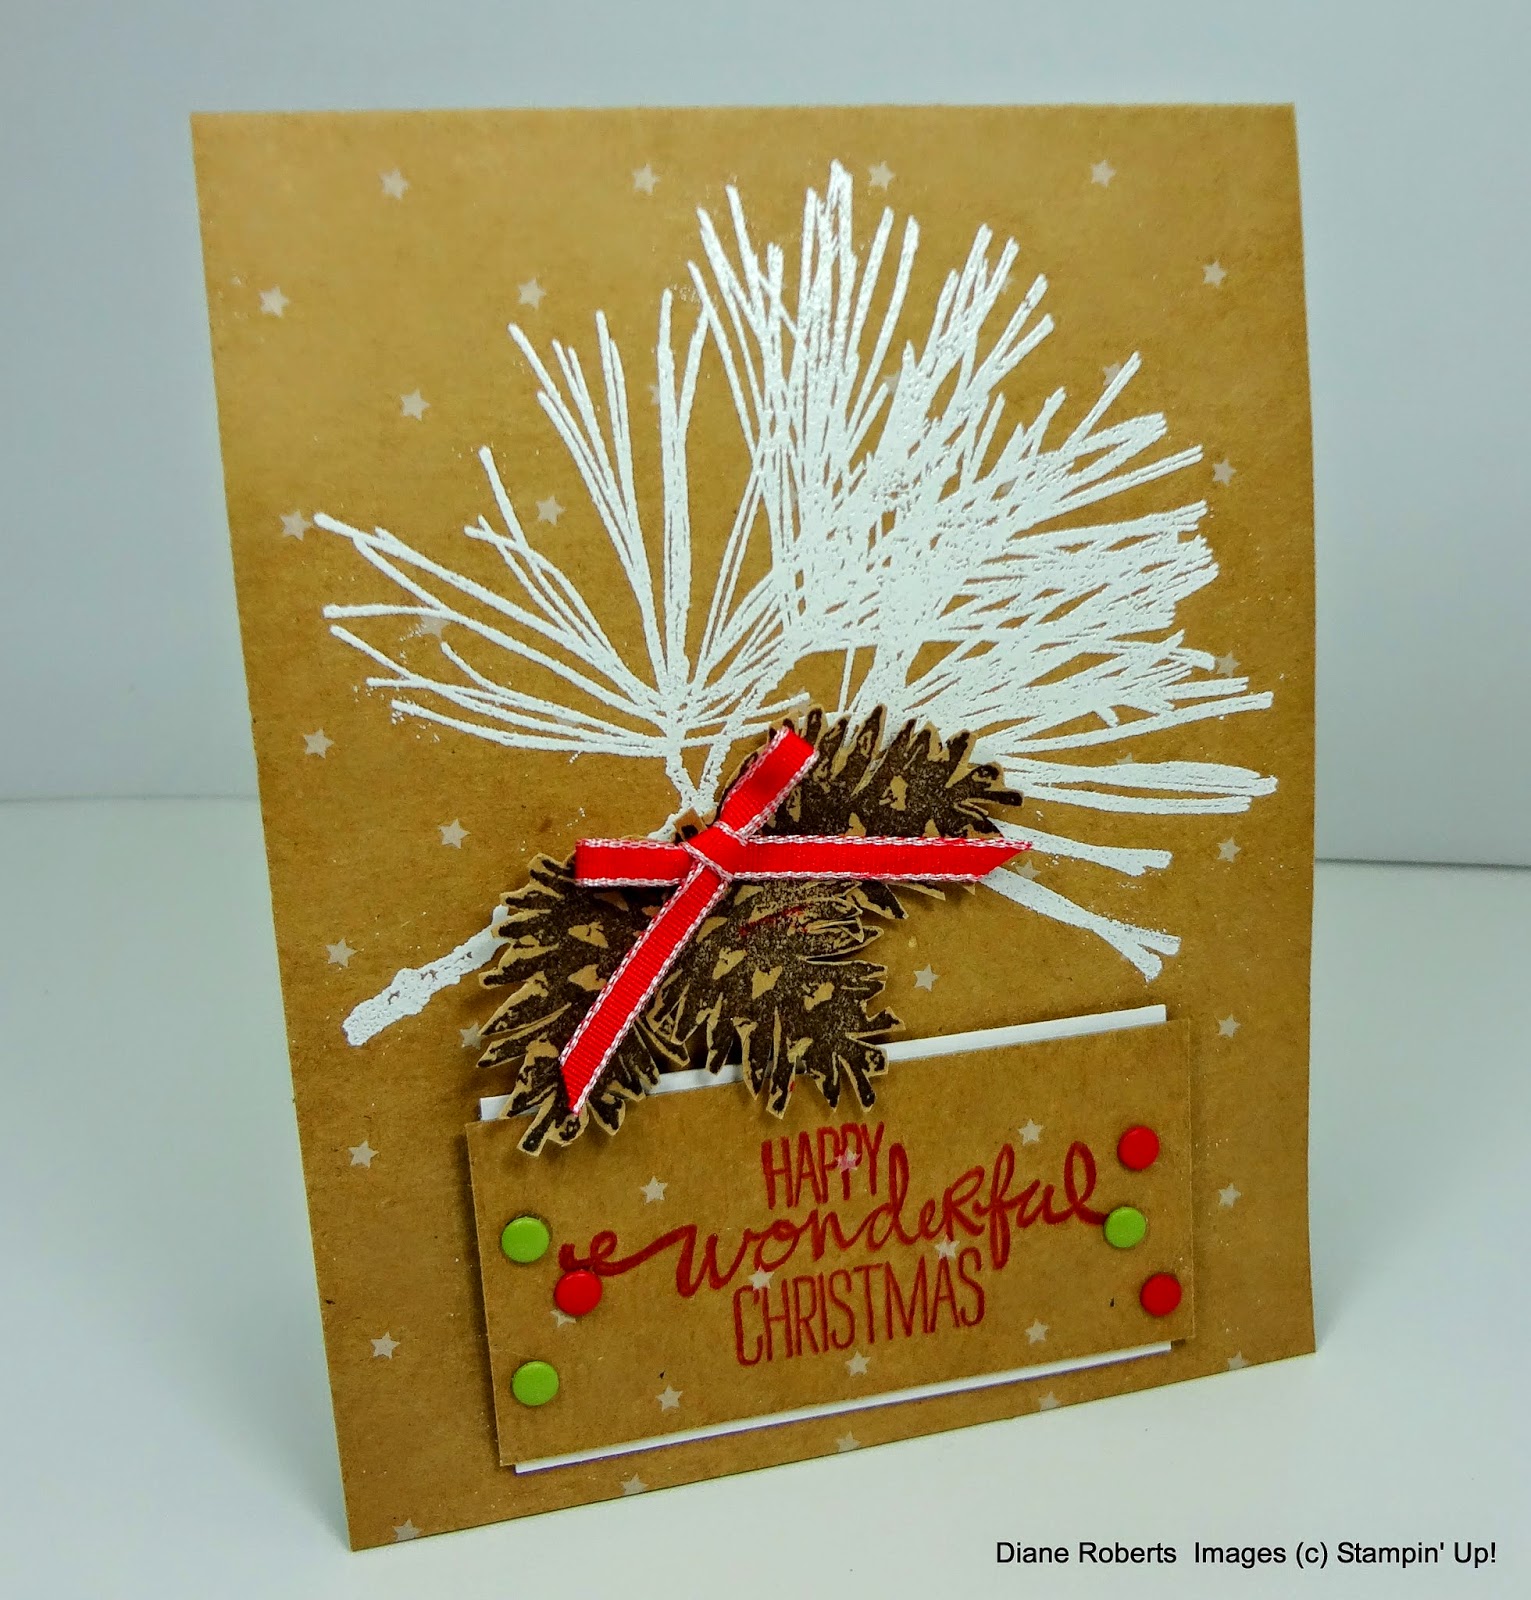
Here is my card:


This was not hard to make if you like fussy cutting.  Stamp the peacock on Whisper White and cut out the tail.  After I cut out the tail, I used an Old Olive Blendabilities to outline the edge.  Then stamp the top of the peacock on the patterned paper and cut out the area above the tail, except for the headdress.  

Layer a piece of the patterned paper on top of the black layer.  On the underside of the white layer, attach a section of window sheet to cover the tail area.  Then build up the backside with foam tape around the tail opening.  Put in all your shaker elements and then attach the black card stock layer.


Saturday, August 30, 2014

Friday, August 29, 2014

Santa and Co, DSP

I love it when a card is all about the paper!

That's what I am posting today.  This DSP is called Santa and Co. and it can be found on page 29 of the Holiday Catalog.  But, rather than Santas, what we have here are Snowmen and Snowflakes.

The DSP is layered on a piece of Whisper White and then a base of Marina Mist.

I added a Marina Mist oval die cut with a heat embossed sentiment from Merry Everything on page 13 of the catalog.


There is an electronic version of the catalog on the right side of this post.  If you don't have a catalog and want one, email me and I will get you one ASAP.

Here are some quick links to the products I used on this card:

Thursday, August 28, 2014

PPA 217

Today is Thursday and there is a Sketch Challenge at Pals paper Arts.

Follow the link to see this week's sketch challenge:  Pals Paper Arts


Here is the sketch:


I enjoy making square cards, but I don't often do it.  I wanted to use my Pleasant Poppies stamp set to say goodbye to summer.  Each day we are getting closer to Fall, which is fine, but I will miss the flowers of spring and summer.

I used a Wild Wasabi card base, a Basic Black die cut and whisper White for the image. 

 First I sponged the Whisper White with Wild Wasabi Ink.  Then I stamped the Poppies with Memento Ink.  I colored the flowers and stems with Blendabilities and then stamped the background with an image from Gorgeous Grunge.  The sentiment is from Ray of Sunshine.

The New Holiday Catalog is Live!

Yahoo!  The New Holiday Catalog is Live!  

 To browse the new catalog click on the link below:


If you would like a copy of the catalog mailed to you, send me an email at  and I will send you one ASAP.

Place an order 24/7 by clicking on the button above (top left)

If you would like to host a workshop in your home, send me an email or give me a call at 401-862-5786.  There is still plent of time to start planning your holiday cards for this year.

Wednesday, August 27, 2014

The Days Before and After

If you follow my blog you probably noticed that I didn't write anything about the cards I posted on Monday and Tuesday.

I didn't say anything because what I had to say was mostly about the new Stampin' Up! catalog that is going live tomorrow!

Rather than tell you about the new products, but not show them to you, I just posted the cards.  Both cards were made from a new DSP Specialty paper called Under the Tree.

This new specialty DSP is meant to be used with our new box making tool.  More about that tool later this week.

I just want  to say that  tomorrow we will have a new PPA challenge as well as the launch of the new catalog.  I will probably post twice so that I can show you my PPA card and also to post the PDF of the new Holiday Catalog.

If you have not received a copy of the new catalog yet, just send me an email with your address and I will get one out to you ASAP.  I have to say, I think this is the best Holiday catalog yet!

SO, good things are coming soon.  Stay tuned and Happy Stamping!

Sunday, August 24, 2014

Be the Star You Are - Bokeh

The Friday Mashup this week taught me a new technique!  Check it out:

Bokeh at the Friday Mashup


It is always fun to learn a new technique.  This is my first attempt.  I plan to do more of this technique and become more proficient.

 I used Night of Navy and Elegant Eggplant inks on Watercolor Paper.  Try this technique, it is fun and it makes you feel "artsy"!  Instead of all circles, I also used tiny stars.

Saturday, August 23, 2014

Another Christmas Card

So here is what I did with one of my tags from yesterday.

I cut the tag top off and mounted it on a piece of DSP from "Under the Tree" and then placed that on a top fold card base of Cherry Cobbler.

I continued the tiny snowflakes in Cherry Cobbler on the card base.  Those snowflakes are from "Visions of Santa"  I stamped "Christmas" from the stamp set "Endless Wishes" in Stazon Jet Black ink.

Gold Baker's Twine is wrapped above and below the focal point sentiment.

Friday, August 22, 2014

Tags for You


My post is a little different today.  Instead of a card, I am showing two tags that I made with a new stamp set called Seasonally Scattered.  This set will be available on August 28th when the new catalog goes live.

I really like the sentiment being the negative part of the design.  (I think that's how you would describe it)

This first one is stamped in Cherry Cobbler on Naturals Ivory card stock.

I actually embellished this original design by using a very small multiple snowflake stamp from a new set called, Visions of Santa.  That is why my design goes all the way to the edge of my tag.


This next one is stamped in Chocolate Chip on Kraft card stock.  The "ribbon" is a few strands form the Burlap Ribbon.


 These tags can be used on gift bags or gift boxes or could also be used on a card.  I am going to do something with these two tags tonight and I will post the results tomorrow.


Meanwhile, Happy Stamping!