This is a good recipe for an appetizer if you are going to a New Year's Eve Party and would like to bring a little something.
12 large Mushrooms
2 Tablespoons butter or margarine
1/2 Cup chopped onions
1/2 Cup pepperoni chopped (I use Turkey Pepperoni)
1/4 Cup chopped green pepper
1 clove garlic minced
1/2 Cup cracker crumbs
3 Tablespoons Parmesan Cheese
1/2 teaspoon salt
1/4 teaspoon oregano
Coarse black pepper (a few grinder turns)
Warm water to moisten (or chicken broth)
Wash mushrooms, remove and chop stems. Melt butter in saute pan; add chopped stems, onions, pepperoni, peppers, and garlic. Cook until soft and onions are translucent. Place crumbs, cheese, salt and pepper in bowl. Add sauteed mixture. Add enough warm water to moisten mixture.
Stuff the mushroom caps and place in a shallow baking dish. Bake at 325 degrees for 25 minutes.
Enjoy
HAPPY NEW YEAR!
Sunday, December 30, 2012
Tuesday, December 11, 2012
Pals Celebrations Blog Hop
We're so glad you could join us for the final Pals Blog Hop of 2012! Today
the Stampin' Pretty Pals are excited to celebrate all of our favorite occasions
of the year! And what's a little celebration without some
sparkle?
You've probably hopped over from Angela Curry at Kindred Stampers I'm stop number 6 on the Pals Hop and I'm glad you hopped in! I'll help you "hop along" from blog to blog where you'll find great ideas for Stampin' Up! products from the Stampin' Pretty Pals! Should you hop off course, simply click on any of the links in the Pals Hop Line-up below and you'll be back on track.
You've probably hopped over from Angela Curry at Kindred Stampers I'm stop number 6 on the Pals Hop and I'm glad you hopped in! I'll help you "hop along" from blog to blog where you'll find great ideas for Stampin' Up! products from the Stampin' Pretty Pals! Should you hop off course, simply click on any of the links in the Pals Hop Line-up below and you'll be back on track.

Celebrate! The card stocks are Whisper White and Basic Black. The Champagne Glass images and the lower case celebrate sentiment are stamps from Stampin' Up!'s Embellished Events. The Upper Case celebrate sentiment is from Seasonal Sayings.
The large celebrate and the champagne glasses are embossed with Silver embossing powder. The lower case celebrate images are stamped with SU Illuminate Ink.
Champagne Glasses are embellished with SU Rhinestone Basic Jewels.
Now hop
along for more inspiring ideas from Beth Beard at My little craft blog stop
number 7 on the Pals Celebrations Blog Hop! Thanks for "hopping" by.

- Dawn Tidd at Tiddbits from Dawn
- Maxine Conrad at Stamp to the MAX!
- Kim Czenszak at LiveLoveStamp
- Julie Trevett-Smith at The Stampin' Affair!
- Kerry Willard Bray at Stampgoodness
- Angela Curry at Kindred Stampers
- Diane Roberts at Score at Four and a Quarter
- Beth Beard at My little craft blog
- Debbie Crowley at expressivelydeb...
- Naki Rager at ...notes from Naki
- Claire Crotteau-Hutt at Stamp Paper Scissors
- Shannon Hokanson at My Stampin Blog
- Nicole Picadura at Scraps & Stamps
- Patti MacLeith at Papercrafts by Patti
- Susan Lankford at stampandscrapwithsusan
- Liz Hughes at DIY Paper Creations
- Peggy Noe at prettypapercards.com
- Mary Fish at Stampin' Pretty
- Nicole Watt at Impressions By Nicole
- Maggie Mata at Maggie Made Cards
- Sherrie Gross at Stampin Sunshine
Sunday, December 9, 2012
Cards Magazine
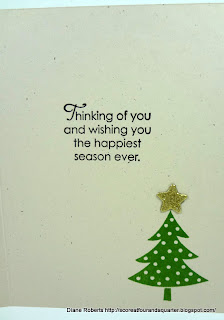
Today's card is my version of Vanessa Menhorn's Merry Christmas on page 32 of the December issue of CARDS Magazine.

I crafted my card using Stampin' Up! products.
The cardstock is Naturals Ivory, my all-time favorite and Gumball Green for the tree. The DSP is from Be of Good Cheer.
The sentiments, both inside and outside are from More Merry Messages stamp set. The tree on the front was die cut with the Framelits Holiday Collection and the stamped tree on the inside is from Scentsational Season.


MERRY CHRISTMAS!
Monday, November 26, 2012
Variations on a Design
When you need a card or two in a hurry, instead of designing a new card, try using a design from another project for your current need. This is what I did for the two birthdays cards here:

I created the Hanukkah card for this month's blog hop and liked the colors used, so I used the design to create two birthday cards.


Quick and easy.

I created the Hanukkah card for this month's blog hop and liked the colors used, so I used the design to create two birthday cards.


Quick and easy.
Sunday, November 18, 2012
Snow Festival
PPA 147 is a sketch challenge.

And as far as I am concerned, this was quite the challenge! So many elements!
I decided use Stampin' Up!'s Snow Festival DSP from the Holiday Catalog. I purchased this DSP for a Workshop, but the workshop got cancelled, so I thought I could use it foe all the different elements of this sketch. Of course, any of the patterns of this pack would have worked equally as well, but I chose the ones you see here:

It was fun! I cut and cut and cut. I cut out the Christmas Tree, I eliminated the hedgehog or porcupine or whatever that little critter is. The Snowflake is the Bold Snowflake Single Stamp and was cut out with the Blossom Punch. The ribbon is SU 1/2" Scallop Dots in Cherry Cobbler.
The "merry" sentiment is from Pennant Parade and was cut out using The Big Shot and the Bitty Banners Framelits. Don't miss out-if you are waiting to get a Big Shot, tomorrow is the day! Monday, November 19th, the On-Line Extravaganza begins! The Big Shot is 20% off! Here is the link to the flyer:
http://www.stampinup.com/us/documents/Online_X_flyer_US.pdf
You can shop 24/7 by using the Shop Now button at the top of my blog.
And as far as I am concerned, this was quite the challenge! So many elements!
I decided use Stampin' Up!'s Snow Festival DSP from the Holiday Catalog. I purchased this DSP for a Workshop, but the workshop got cancelled, so I thought I could use it foe all the different elements of this sketch. Of course, any of the patterns of this pack would have worked equally as well, but I chose the ones you see here:

It was fun! I cut and cut and cut. I cut out the Christmas Tree, I eliminated the hedgehog or porcupine or whatever that little critter is. The Snowflake is the Bold Snowflake Single Stamp and was cut out with the Blossom Punch. The ribbon is SU 1/2" Scallop Dots in Cherry Cobbler.
The "merry" sentiment is from Pennant Parade and was cut out using The Big Shot and the Bitty Banners Framelits. Don't miss out-if you are waiting to get a Big Shot, tomorrow is the day! Monday, November 19th, the On-Line Extravaganza begins! The Big Shot is 20% off! Here is the link to the flyer:
You can shop 24/7 by using the Shop Now button at the top of my blog.
Tuesday, November 13, 2012
Pals November Winter Wishes Blog Hop


The Stamp Set that I am recommending for your wish list is Jewish Celebrations. This set is in the Holiday Catalog and we just found out yesterday that it is being carried over and will still be available after the Holiday Catalog ends. The images are quite lovely and when used with the Illuminate Ink Pad the results are beautiful. You will be able to create a special card for your celebrations. My sample above was made with SU Midnight Muse and Very Vanilla card stock, Midnight Muse and Illuminate inks, the Fancy Fan Embossing Folder and some Pearl Basic Jewels. This card is clean and simple and can easily be duplicated for everyone on your mailing list.
Now hop along for more inspiring ideas from Kim Czenszak at Live Love Stamp, stop number 17 on the Pals Winter Wishes Blog Hop! Thanks for "hopping" by!


- Lori Martin at The Rejoicing PaperCrafter
- Kerry Willard Bray at Stampgoodness
- Nicole Picadura at Scraps & Stamps
- Debbie Crowley at expressively deb...
- Janice Warhank at Janice's Papercraft Playground
- Beth Beard at My Little Craft Blog
- Julie Trevett-Smith at The Stampin' Affair!
- Rae Harper at Wild West Paper Arts
- Bobbi Mangas at My Therapy
- Nicole Watt at Impressions by Nicole
- Claire Crotteau-Hutt at Stamppaperscissors
- Susan Lankford at Stamp and Scrap With Susan
- Dawn Tidd at Tiddbits From Dawn
- Nancy Gleason at My Stampin' Space
- Angela Curry at Kindred Stampers
- Diane Roberts at Score at Four and a Quarter
- Kim Czenszak at Live Love Stamp
- Mary Fish at Stampin' Pretty
- Angie Blake at Angie's Musings
- Sherrie Gross at Stampin Sunshine
- Barb Furlong at The Love of Stamping
- Peggy Noe at Prettypapercards.com
- Shannon Hokanson at My Stampin Blog
- Debbie Pierce at Stampin' Sunshine
Sunday, November 11, 2012
Envelope Book of Many Pockets
I learned how to make one of those mini envelope books at a Stamping Blitz last week held at Bella Art in Johnston, RI. There are SO many pockets in this little book.
I made one at home using Stampin' Up products. Here is my little book which uses the DSP International Bazaar:

The ribbon is SU 1/4" Stitched Grosgrain in Rich Razzleberry, the flower was punched from Rich Razzleberry using the Blossom Petals Builder Punch, and the center Ia a SU Antique Brad.
Here it is opened up so you can see the many pockets.

This little booklet is made from 6 business size #10 envelopes, glued together.

Monday, November 5, 2012
Love Doesn't Melt
Here is a card for my dear cousin Nancy, who left New England many years ago to live in Florida. I will be sending a little snow her way.
I am submitting this for the PPA challenge 146.
I used Stampin' Up! retired Merry Winter and the current Perfectly Preserved stamps sets. The card stock is Crumb Cake, Very Vanilla and (retired) Ruby Red. Inks are Crumb Cake and Ruby Red.


I am submitting this for the PPA challenge 146.
I used Stampin' Up! retired Merry Winter and the current Perfectly Preserved stamps sets. The card stock is Crumb Cake, Very Vanilla and (retired) Ruby Red. Inks are Crumb Cake and Ruby Red.

Monday, October 29, 2012
Trick or Treat Microwave Popcorn Sleeves
Here is an idea for a Halloween Treat: Sleeves for microwave popcorn.
 All products are Stampin' Up!


Sunday, October 14, 2012
Cherry Cobbler and Crumb Cake

Using a piece of Crumb Cake card stock (4" X 5.25") and Cherry Cobbler ink I stamped "Greetings of the Season" from the SU stamp set of the same name. I sponged the edges with Cherry Cobbler.
Using the Holiday Ornament Framelits Die set and the Big Shot, I cut out two ornaments. Then I selected one of the designs in the "Be of Good Cheer" Designer Series Paper collection and centered a portion of the design on the card proper so that when I placed the top layer over the card, the design would look centered on the ornament.
Using dimensionals, I place the cut out layer over the DSP on the card. The ornaments are "hanging" from Cherry Cobbler Baker's Twine.
Thursday, October 11, 2012
Christmas Tealight Easel Card
This is a project I CASEd from Stampin' Up! Demonstrator Tami White. Here is the link to her great video on making this card. It looks complicated, but it goes quick!
http://www.youtube.com/watch?v=47dVtGiJvfM&feature=g-user-u

You night not be able to see that there is a battery operated tea light candle behind the vellum oval. See below:

The Stampin' Up! Stamp Set is Joyous Celebrations. I am going to make several of these and use the Joy stamp, the Christmas Tree, and the Ornament on the vellum panel. This is a real cute idea and such a fun project to complete. I hope you try making one. Have Fun!
Tuesday, October 9, 2012
Pals October Trick-or-Treat Blog Hop!
My Trick or Treat project is this Spooky Halloween card. All products are Stampin' Up!.

Card Stock: Basic Black, Tangerine Tango and Old Olive
DSP: Paper Stack Brights Collection
Ribbon: 3/8 Inch Taffeta Ribbon Old Olive and Pumpkin Pie
Stamp Sets: Wicked Cool and Dark and Dreary (retired)
Ink: Illuminate Glimmer Watermark
You've been TRICKED! Lucky you! I'm sharing a great trick that you can use on your next project.
My trick is the "direct to paper" method of ink application. Stampin' Up!'s Illuminate Glimmer Watermark ink adds a luminous shimmer to stamped images. When I used the Stampin' Up! Illuminate ink, I applied the ink directly to the card stock; ink pad to paper.
After embossing the Spider Web design on the Basic Black card stock, I simply placed the opened ink pad directly on the embossed design and dragged it along the length of the design. You can see the dragged effect below. This is an alternate method of applying ink, and for this project, it produced a cool effect.

I needed a Spider for my web so I resurrected the Spider image from the Dark and Dreary stamp set. This ink worked well on the black card stock to produce the spider, which I then cut out and placed on the spider web.
The Illuminate Glimmer Watermark ink is available in the Holiday Catalog on page 23. My next project for this ink will be some shimmery Christmas ornaments.
Now hop along for more tricks and treats and some spooky ideas from Laurie Chilton at Stampin' Ink, stop number 13, on the Pals Trick-or-Treat Blog Hop! Thanks for "hopping" by.


- Barb Furlong at The Love of Stamping
- Kim Czenszak at Live Love Stamp
- Nicole Picadura at Scraps & Stamps
- Mary Fish at Stampin' Pretty
- Beth Beard at My Little Craft Blog
- Peggy Noe at Prettypapercards.com
- Kerry Willard Bray at Stampgoodness
- Debbie Crowley at expressively deb...
- Naki Rager at ...notes from Naki
- Sherrie Gross at Stampin Sunshine
- Claire Crotteau-Hutt at Stamppaperscissors
- Diane Roberts at Score at Four and a Quarter you are here
- Laurie Chilton at Stampin' Ink
- Katy McGloin at Just Fun Stamping
- Rae Harper at Wild West Paper Arts
- Brian King at Stamp with Brian
- Ann Schach at The Stampin' Schach
- Nicole Watt at Impressions by Nicole
- Shannon Hokanson at My Stampin Blog
- Maggie Mata at Maggie Made Cards
- Sandra Conner at Pretty Provisions
- Nancy Gleason at My Stampin' Space
Monday, October 8, 2012
Sneak peek!
Stop by for a chance to get Tricks (tips) for card making and scrap booking or to win Treats -Blog Candy!
Hop on by tomorrow!
Thursday, October 4, 2012
Pleasant Poppies
For the PPA144 challenge, I used Stampin' Up!'s Pleasant Poppies. I stamped on vellum using SU Early Espresso and heat embossed with a clear embossing powder.
I also stamped the butterfly from SU Papillion Potpourri and heat embossed with the clear powder.
To color the flowers and butterfly, I turned the design over and using a SU Blender Pen I colored on the back of the design with Cajun Craze and More Mustard inks. The color is subdued, but I liked the look so I repeated this coloring on the butterfly.


Using Stampin' Up!'s Delicate Designs Embossing Folder I embossed the bottom of the card. The body of the card was originally Early Espresso but when I added the vellum overlay, the look of the card was too dark. So I cut off the embossed bottom of the Early Espresso and trimmed the scallop edge. Then I turned it around so that the scallop was on the top and I placed it at the bottom a More Mustard card base. (There is a possibility that this is Crushed Curry and not More Mustard; I seem to have discarded the bag the card stock came in- this is full disclosure. The vellum makes the color look so light; it almost looks like Daffodil Delight-which I know it is not. I still have the Daffodil delight is its wrapper-still labeled ) Then I let the embossing hang a bit longer than the vellum.
The sentiment is from Affection Collection.
I also stamped the butterfly from SU Papillion Potpourri and heat embossed with the clear powder.
To color the flowers and butterfly, I turned the design over and using a SU Blender Pen I colored on the back of the design with Cajun Craze and More Mustard inks. The color is subdued, but I liked the look so I repeated this coloring on the butterfly.

I loved the butterfies ad I have a tendency to place too many butterflies on a card. I wanted to use a Cajun Craze and a More Mustard one on this card, but it just looked like too much. So I will show you the extra butterflies here.

Using Stampin' Up!'s Delicate Designs Embossing Folder I embossed the bottom of the card. The body of the card was originally Early Espresso but when I added the vellum overlay, the look of the card was too dark. So I cut off the embossed bottom of the Early Espresso and trimmed the scallop edge. Then I turned it around so that the scallop was on the top and I placed it at the bottom a More Mustard card base. (There is a possibility that this is Crushed Curry and not More Mustard; I seem to have discarded the bag the card stock came in- this is full disclosure. The vellum makes the color look so light; it almost looks like Daffodil Delight-which I know it is not. I still have the Daffodil delight is its wrapper-still labeled ) Then I let the embossing hang a bit longer than the vellum.
The sentiment is from Affection Collection.
Sunday, September 30, 2012
Dryer Sheet Technique
I have seen this technique on some card samples at shows and thought I would give it a try. The idea is to create your card and then using a glue stick right on the image, glue a used dryer sheet on your design.
 All products are Stampin' Up!. I used the Affection Collection stamp set, Midnight Muse ink and Very Vanilla and (retired) Crushed Curry Card Stock. The DSP is from Comfort Cafe . I machine stitched the layers to the card stock. A few pearls finished the design.
Tina Weller, the Serene Stamper has a great video describing the technique. http://www.youtube.com/watch?v=22GULxYMDWg&feature=player_embedded
I used the Snow Much Fun stamp set to create this version:


Tina Weller, the Serene Stamper has a great video describing the technique. http://www.youtube.com/watch?v=22GULxYMDWg&feature=player_embedded
I used the Snow Much Fun stamp set to create this version:

Save a few of your used dryer sheets and give this technique a try.
Sunday, September 23, 2012
Simply Scrappin'
When I went to the Stampin' Up! Providence Regional event, everyone won the Simply Scrappin' paper pack shown on page 9 of the Holiday catalog. I thought it would be the perfect paper to use for the PPA Clean and Simple sketch challenge. Here is the sketch:

 I used the Very Vanilla and the Basic Gray card stock and the coordinating DSP from the pack. The pack has some decorative stickers and trim which I used for the strip (2) and circle (4). The sentiment is from SU Teeny Tiny Wishes stamp set
I used the Fancy Fan Folder to emboss.
The Simply Scrappin' pack is great for scrap-booking, but it deserves a second look for card making.

I used the Fancy Fan Folder to emboss.
The Simply Scrappin' pack is great for scrap-booking, but it deserves a second look for card making.
Sunday, September 16, 2012
Happy 40th Birthday
Every cardmaker should own Stampin' Up's Memorable Moments Stamp Set. I use it at least twice a month, but probably more than that. Between milestone birthdays and annivesaries, you will get your money's worth and then some. Add to that the fact that it is compatible with the Framelits Labels Collection, and you've got a winner, all the way around.
My son turns 40 years old today! I don't know where the time has gone... Of course I wanted to make him a special card, but you can't get all fancy with a masculine card. I have CASEd the card on page 138 of the SU catalog before, and always with a little twist. So I CASEd again.

Here it is using Soft Suede and Very Vanilla card stock and Comfort Cafe DSP. Inks are Soft Suede and Midnight Muse. Besides the Memorable Moments, I also used the From My Heart Collection. I used the Essentials Paper-Piercing Pack to pierce the card front and the inside as well. The sentiment on the front of the card, a James Taylor quote (just love it!) was cut out with the Framelits Apothecary Accents.
 More Comfort Cafe on the inside along with more piercing
My son turns 40 years old today! I don't know where the time has gone... Of course I wanted to make him a special card, but you can't get all fancy with a masculine card. I have CASEd the card on page 138 of the SU catalog before, and always with a little twist. So I CASEd again.

Here it is using Soft Suede and Very Vanilla card stock and Comfort Cafe DSP. Inks are Soft Suede and Midnight Muse. Besides the Memorable Moments, I also used the From My Heart Collection. I used the Essentials Paper-Piercing Pack to pierce the card front and the inside as well. The sentiment on the front of the card, a James Taylor quote (just love it!) was cut out with the Framelits Apothecary Accents.

Tuesday, September 11, 2012
Pals Fall Flair Blog Hop
Using Stampin' Up!'s Very Vanilla and Early Espresso Card Stock, I have created my Thanksgiving Card using the Triple Layering Technique. The leaves from the Gently Falling two step stampp set, are stamped first with Crumb Cake and then Early Espresso. The sentiment is from Teeny Tiny Wishes and the Button is from the Naturals Designer Buttons, tied with SU Linen Thread.

The sentiment on the inside of the card is from SU Seasonal Sayings.

Now hop along for more inspiring ideas from Maggie Mata at Maggie Made Cards, stop number 22, on the Pals Fall Flair Blog Hop! Thanks for "hopping" by!
- Nicole Watt at Impressions By Nicole
- Beth Beard at My Little Craft Blog
- Maxine Conrad at Stamp to the MAX
- Claire Crotteau-Hutt at stamppaperscissors
- Susan Lankford at Stamp and Scrap With Susan
- Nicole Picadura at Scraps and Stamps
- Bobbi at My Therapy
- Mary Fish at Stampin' Pretty
- Barb Furlong at The Love of Stamping
- Rae Harper at Wild West Paper Arts
- Sherrie Gross at Stampin Sunshine
- Lynn at Cattaildesigns
- Dawn Tidd at Tiddbits from Dawn
- Kim Czenszak at Live Love Stamp
- Naki Rager at ...notes from Naki
- Kerry Willard Bray at Stampgoodness
- Patti MacLeith at Papercrafts by Patti
- Peggy Noe at Pretty Paper Cards
- Kim Luithle at Kim's Stampin Stuff
- Lori Martin at The Rejoicing Papercrafter
- Diane Roberts at scoreatfourandaquarter
- Maggie Mata at Maggie Made Cards
- Kris Kilcoyne at Kween Bee Kreations
- Julie Trevett-Smith at The Stampin' Affair!
- Jennifer Takacs at Stamped in Full
- Katy McGloin at Just Fun Stamping


Saturday, September 8, 2012
Toxic Treats PPA 142
This spooky witch is one of the images in Stampin' Up!'s "Toxic Treats" stamp sets. I used this set to participate in the PPA Color Challenge 142.
Here are the colors:

Here are the colors:

I love this color combination (although my eggplant photographed a bit on the blue side). Other Stampin' Up! products used are the Framelits Labels Collection and the Spider Web Embossing Folder.
Sunday, September 2, 2012
Shipping Tags
Its back to school time and although I am not returning to school I love this time of year. My favorite thing about back to school time is shopping for school supplies. I guess that is why I am such a fan of paper crafting.
I was poking around at Staples the other day and noticed the shipping labels. There are 100 in a package for $5.85. I bought a pack to experiment.
Labels are very popular in card making right now, but rather than having to cut my own from card stock, I decided to these a try.
 Well, I am having a grand time with these tags. Here is a Thank You card I made with one of the tags. The tags measure 4 3/4 x 2 3/8. I snipped a bit off the bottom for this card.
Postage Due from Stampin' Up! is the image, stamped in SU Crumb Cake and the card stock is SU Soft Suede. The Thank you is stamped in Midnight Muse. The border design is the Framed Tulips embossing folder. Add some linen thread and an Antique Brad and you are good to go!
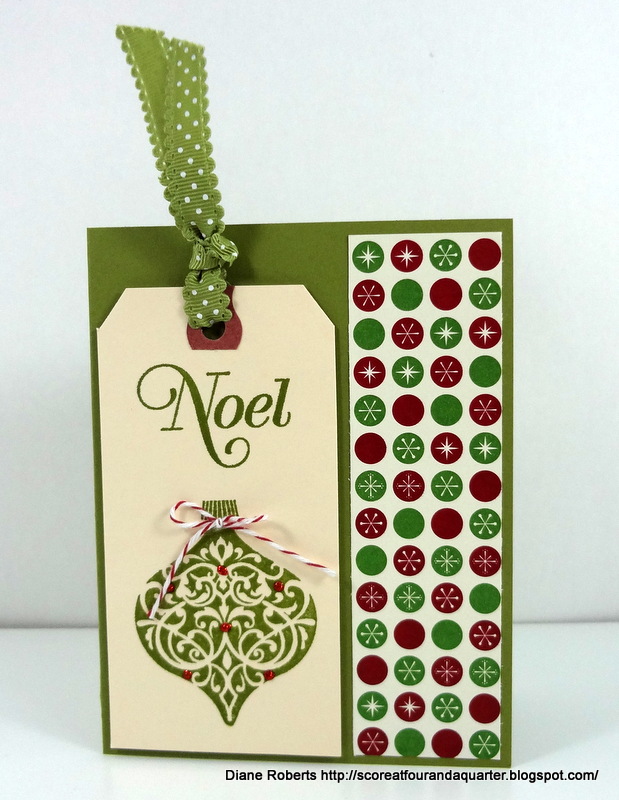
Now for a Christmas design.
 All products (except the tag) are Stampin' Up!.
Stamp Sets: Ornaments Keepsakes, Greetings of the Season
Ink: Old Olive
Ribbon; Old Olive Scallop Dots
DSP: Be of Good Cheer
Cherry Cobbler Baker's Twine
Cherry Cobbler Dazzling Details
I was poking around at Staples the other day and noticed the shipping labels. There are 100 in a package for $5.85. I bought a pack to experiment.
Labels are very popular in card making right now, but rather than having to cut my own from card stock, I decided to these a try.

Postage Due from Stampin' Up! is the image, stamped in SU Crumb Cake and the card stock is SU Soft Suede. The Thank you is stamped in Midnight Muse. The border design is the Framed Tulips embossing folder. Add some linen thread and an Antique Brad and you are good to go!
Now for a Christmas design.
Stamp Sets: Ornaments Keepsakes, Greetings of the Season
Ink: Old Olive
Ribbon; Old Olive Scallop Dots
DSP: Be of Good Cheer
Cherry Cobbler Baker's Twine
Cherry Cobbler Dazzling Details
Subscribe to:
Posts (Atom)